

Software, Technology, Online Tools
How to Improve Facial Clarity in Interviews and Online Course Videos

When you record an interview or an online course, the person speaking is usually the focus. Even with clear audio and a strong message, slightly soft facial details can make the footage look less polished on a laptop or larger screen. If a reshoot is not practical, a video enhancer may help improve facial clarity before you publish or share the recording.
AI video enhancement tools can help improve the appearance of facial details in recorded footage. For example, UniConverter provides a desktop AI video enhancer with a dedicated Face Enhancement mode. In UniConverter 18, this feature was refined to help reduce flicker in enhanced faces and keep facial detail more consistent across frames, especially when a face is slightly out of focus or partly obscured. However, results depend on the original recording quality, and enhanced footage should always be reviewed for accuracy and natural appearance.
Why Facial Detail Matters in Interviews and Online Course Videos
In an interview video, viewers read the speaker's expressions while listening to the conversation. In an online course recording, the instructor's face can help make an explanation feel more personal and easier to follow. If the eyes or mouth look soft, the result may feel less polished, especially when the same clip is viewed at different screen sizes.
You may notice the issue after exporting a webinar, compressing a remote interview, or preparing lesson videos for a course platform. A face-focused video enhancement pass is worth testing when the original footage is usable, but the person on screen needs more definition. The aim is to improve the recording's appearance, not to change the speaker's identity.
How AI Video Enhancement Can Improve Facial Clarity
Face enhancement technology is designed to improve the appearance of facial details in portraits, interviews, and other person-focused recordings. Depending on the software, these tools may use AI models to sharpen facial features, reduce visible noise, and improve consistency between frames.
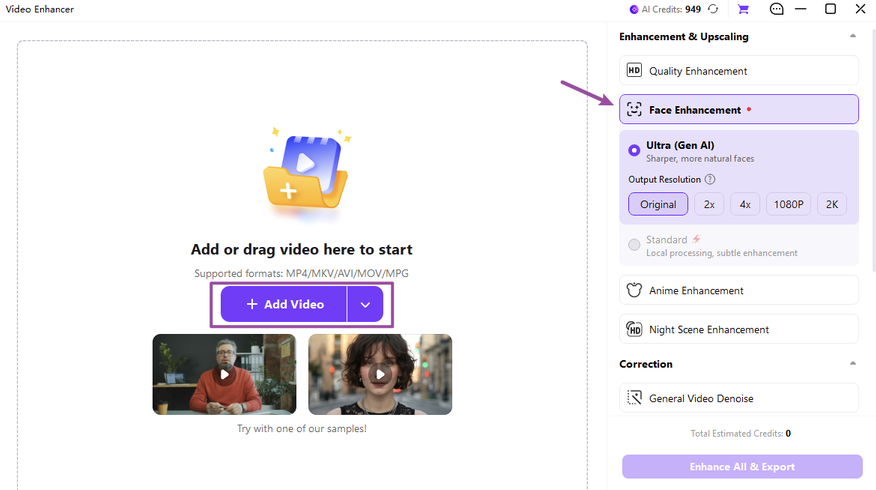
For example, UniConverter's Face Enhancement feature includes processing options intended to improve facial detail stability. Its Ultra (Gen AI) mode uses generative processing, while Standard offers subtler local processing in supported Windows setups. Because generative enhancement can add or alter fine textures, it is important to compare facial features with the original clip before exporting.
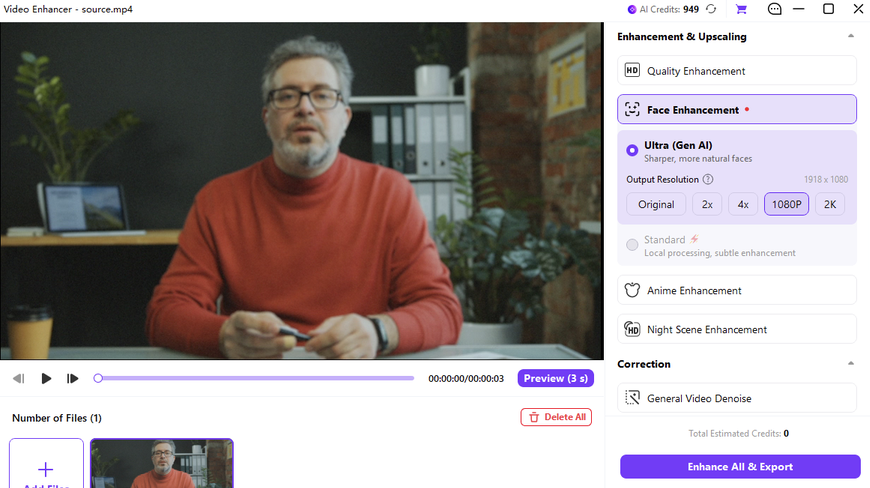
Some video enhancement tools also offer resolution adjustments, allowing users to retain the original dimensions or upscale footage to a higher resolution. Available options may include 2x, 4x, 1080P, or 2K, depending on the software and source file. However, increasing resolution does not necessarily recover missing details or improve the accuracy of facial features.
If an interview or lesson mainly suffers from color shifts, noise, or camera shake, the corresponding correction tool may be more suitable than face enhancement.

When to Use a Video Enhancer for Interviews and Lessons
1. Recorded Online Courses and Training Videos
When you teach on camera, viewers watch your expression while following the lesson. If the instructor's face looks slightly soft after editing or compression, previewing face enhancement may improve its perceived clarity. Check the result at a normal viewing size and make sure facial features still look natural as you speak.
2. Interview Videos, Webinars, and Presentation Clips
A recorded interview might later become a webinar replay, a short highlight, or a clip for a company presentation. Re-encoding and compression can make facial details less defined. Before sharing the video again, test a representative section with a video enhancer and check the speaker's eyes, mouth, and expression during movement.
3. Personal Introductions and Family Recordings
The same approach can help with a personal introduction, a recorded message, or a family video. Here, a recognizable, natural-looking face matters more than an unusually sharp background. Try face enhancement on a short section and compare the result carefully, especially around skin texture, glasses, and hairlines.
How to Enhance Interview and Online Course Videos on Desktop
The following steps illustrate a typical desktop face enhancement workflow using UniConverter as an example. Although the interface and available settings vary between applications, the general process involves importing footage, selecting an enhancement mode, previewing the results, and exporting the processed video.
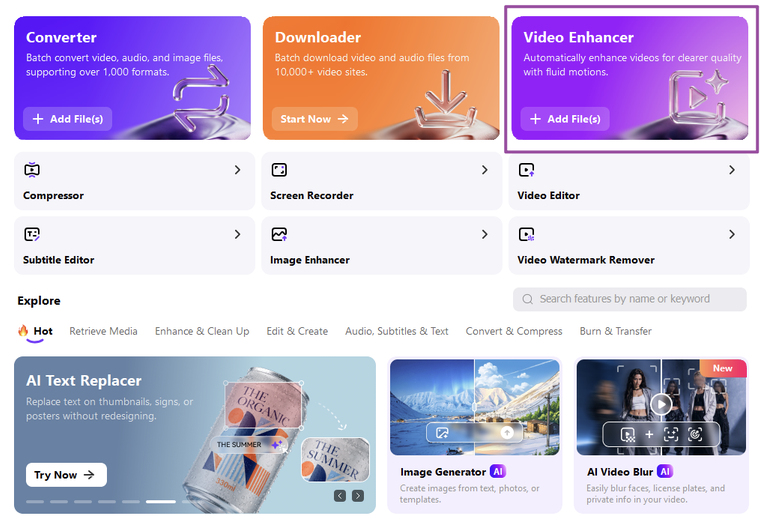
Step 1: Open the Video Enhancement Tool
Launch your preferred video enhancement software on your computer. Navigate to the video enhancement or editing section and locate the option to import a video file. The exact interface and available features will vary depending on the software.
Step 2: Import Your Video and Select an Enhancement Mode
Import the interview or lesson recording into the workspace. Look for enhancement options such as facial sharpening, noise reduction, or AI-based detail restoration. If a dedicated face enhancement mode is available, select it to focus on improving facial clarity. Choose a processing mode based on the quality of the original footage and the level of enhancement needed.
Step 3: Adjust Settings and Preview Facial Detail
Choose an output resolution appropriate for your recording and intended viewing platform. Some tools allow you to retain the original resolution or upscale the footage to a higher resolution. Use the preview function to examine a short section of the video, preferably when the speaker turns, blinks, or changes expression. Check whether facial details remain consistent throughout the movement.
Step 4: Compare the Results and Export
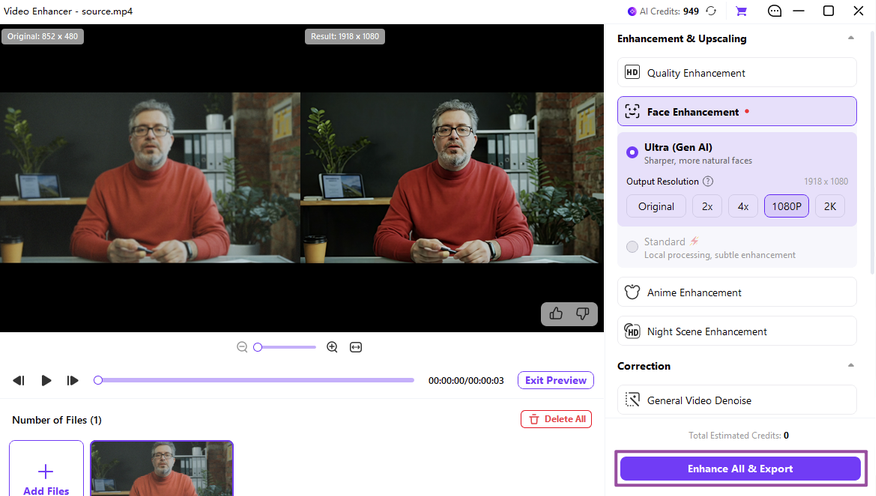
Compare the original and enhanced versions before exporting. Pay attention to the eyes, glasses, hairline, and skin texture for any unnatural changes or visual artifacts. If the enhanced footage looks natural and preserves the speaker's recognizable features, select the appropriate export format and save the processed video to your computer.
Tips for Natural-Looking Interview and Course Videos
- Preview moving expressions: Check a moment when the person turns, blinks, or speaks rather than judging a single still image.
- Choose resolution for the final use: An online lesson may be viewed on different screens, but a larger file is not automatically a clearer or more accurate one.
- Check the small details: Eyes, glasses, teeth, hairlines, and skin texture can reveal unwanted changes from generative enhancement.
- Use the right correction tool: Face enhancement targets person-led footage. For general noise, color, or camera shake, use the relevant correction tool instead.
- Preserve the original recording: Keep an unedited copy so you can compare results and return to the source if the enhancement introduces unwanted changes.
Conclusion
Improving facial clarity can make interviews, online courses, and other person-focused recordings easier to watch. AI video enhancement tools offer options for sharpening facial details, adjusting resolution, and improving visual consistency, but their effectiveness depends on the quality of the original footage.
Before processing an entire recording, preview a representative section and compare the enhanced result with the source. The goal should be to improve perceived clarity while preserving natural expressions and recognizable facial features. In some cases, basic adjustments to lighting, contrast, or noise may produce better results than generative face enhancement.
FAQ
Frequently Asked Questions
011. How can I improve the quality of an interview video?
Start by checking the recording's lighting, sharpness, and compression quality. Video editing software can help adjust exposure, contrast, and noise. If facial details remain slightly soft, a face enhancement tool may improve perceived clarity. Always compare the result with the original footage.
022. Can I enhance a recorded online course without reshooting?
Yes, some visual issues can be improved through video editing and AI enhancement. If the recording is usable but facial details look slightly soft, test face enhancement on a representative lesson clip. However, these tools cannot guarantee recovery of details that were never captured.
033. Can an AI video enhancer fix a badly blurred face?
Not reliably. The result depends on source quality, face size, and obstruction. Generative processing may create plausible details rather than recover the exact original information.
044. Can I improve facial detail without increasing video resolution?
Yes. Some enhancement tools allow processing of facial details while retaining the original video dimensions. Increasing resolution is optional and should depend on the intended viewing platform and source quality.
055. What types of face enhancement modes are available?
Available modes vary by software. Some applications use generative AI to reconstruct facial textures, while others apply more conventional sharpening or local processing. For example, UniConverter offers Ultra (Gen AI) and Standard modes in supported desktop environments. Comparing the preview results can help determine which approach is more appropriate.
066. What video formats do desktop enhancement tools accept?
Many desktop video enhancement applications support common formats such as MP4, MKV, AVI, MOV, and MPG. Supported formats and processing limitations vary by application and enhancement mode.
077. Are AI face enhancement tools available online?
Some online video enhancement services provide general quality restoration, sharpening, and upscaling. However, dedicated face enhancement features may be limited to desktop applications. Check the available processing modes and privacy considerations before uploading recordings to an online service.
Comments
Comments are available to signed-in users and are moderated to keep the discussion useful and respectful. Spam, automated submissions, and low-value promotional comments are removed. Outbound links may be approved when they are relevant and genuinely helpful to readers, but they are displayed as plain text rather than clickable hyperlinks.
No comments have been published yet.
Please sign in to submit a comment.