The MacBook Pro laptop benefits from a more powerful chip and more consistent performance than other series, making it the first choice for most businesses and office employees.
With the popularity of home office mode, screen recording is a crucial tool for online meetings, creating tutorials, sharing presentations, and recording gameplaying procedures, etc., in daily work. Work can be made simpler by learning to screen record on a MacBook Pro with sound.
Now, let's dive into the specific methods.
How to Screen Record on MacBook Pro - 5 Ways
1. Screen Record on MacBook Pro with Sound via EaseUS RecExperts
Regarding the best screen recorder for MacBook Pro, EaseUS RecExperts for Mac must be on the list. It is well-known for its numerous recording features and simple operations. It is an all-in-one tool with video recording and editing capabilities.
It allows you to record whole/part screen, only audio, webcam, and games without a time limit or watermark. You can record the screen on your MacBook with sound with this lightweight screen recorder without any hassle, and it will get access to the sound from both system audio and microphone simultaneously.
EaseUS RecExperts for Mac is such an excellent and professional screen recorder that owns tons of features to make you choose it with confidence:
- Record screen and webcam at the same time
- Record audio only, or extract audio from a video
- A scheduled recording plan will automatically start and end a recording task
- Free screenshot feature
- Save and output video in 10+ formats, like MOV, MP4, AVI, FLV, MKV, etc.
- Edit, trim the video, and add effects to your video
Follow the simple steps below to record the screen with sound on MacBook Pro:
Step 1. Download and launch EaseUS RecExperts on your Mac. To capture the whole screen, click on the "Full Screen" button from the main interface. If you want to customize the recording area, choose the "Region" button.
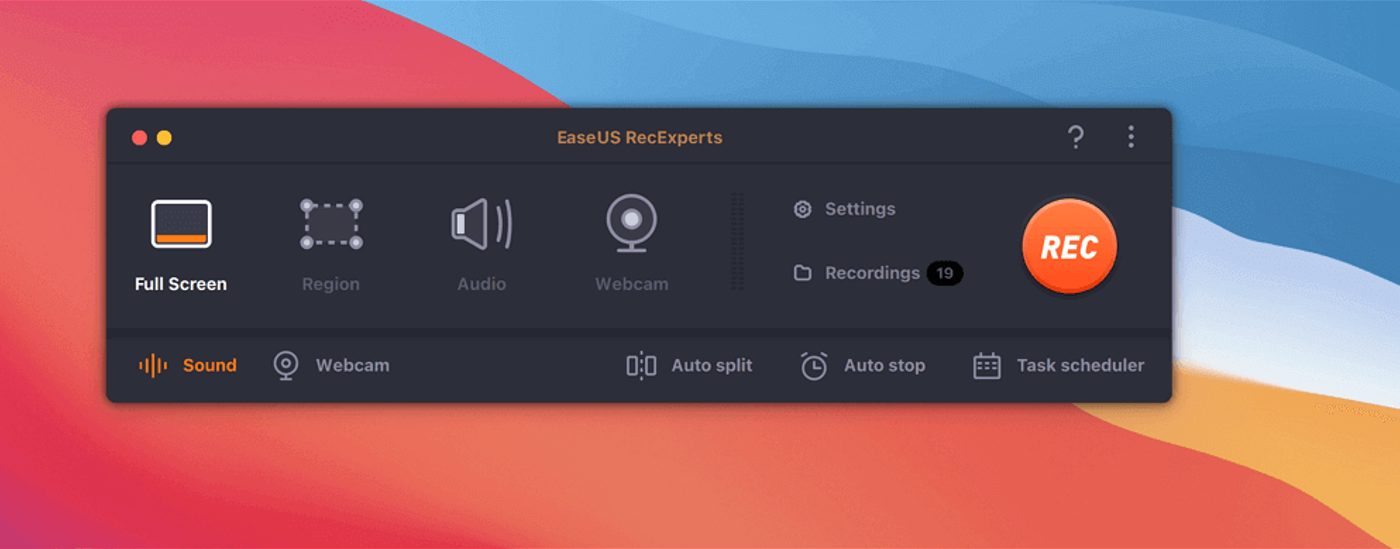
Step 2. To record the screen with audio, hit the Sound icon from the bottom left side of the toolbar. The audio resources can be your external sound or system audio. Based on your needs, enable the target option.
Step 3. Before capturing, you can change the output format of the recorded video by clicking "Settings" from the main interface. Then, scroll down the menu of Output format for Video. Choose the output type as you like.
Step 4. Once done, click the REC button to begin recording. It captures anything displayed on your Mac screen. When you are done, click the Stop button. Then you can watch the recorded video from "Recordings".
2. Screen Record on MacBook Pro with Sound via Camtasia
If you don't know how to screen record on Mac with internal audio, Camtasia is your choice. This screen recorder from TechSmith allows you to record system audio and microphone while screen recording on a MacBook Pro laptop. With it, you can make professional videos and share them with your friends and colleagues.
The cursor highlights feature while recording is one of Camtasia's distinguishing features since it makes the important stuff more obvious. Additionally, Camtasia has video editing tools that allow you to add to or edit recorded footage.
Now, follow the steps below to record the screen with sound on your MacBook Pro:
Step 1. Download and launch the Camtasia macOS version on your MacBook Pro.
Step 2. Select an area to record. You can choose to record the whole or record part of the screen.
Step 3. Slide the button to open the microphone or system audio or enable them simultaneously.
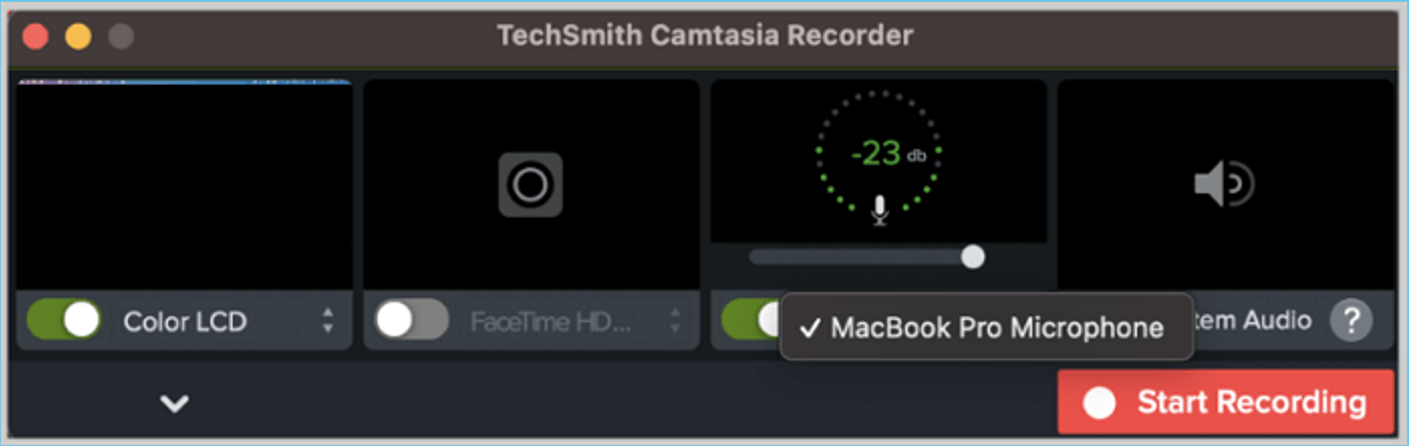
Step 4. Click the red "Start Recording" button to start the recording process.
Step 5. When finished, you can save and edit the video.
3. Screen Record on MacBook Pro with Sound via OBS Studio
OBS Studio is a free and open-source screen recorder for any screen recording and live streaming. It is one of the best screen recorders for Mac with internal audio and widely used for its professional design and multi-platform compatibility. You can use it to capture screens as well as sound and webcam on macOS, Windows, and Linux systems.
It is the choice for most game players because it can share recordings to multiple platforms in real-time.
❗ However, due to its complex interface and operation, the OBS isn't so suitable for beginners.
Refer to the following guide to screen record with sound on MacBook Pro:
Step 1. Download and install OBS Studio on your MacBook Pro.
Step 2. Click "Setting" on the main interface, and adjust "Audio" settings to your preference.
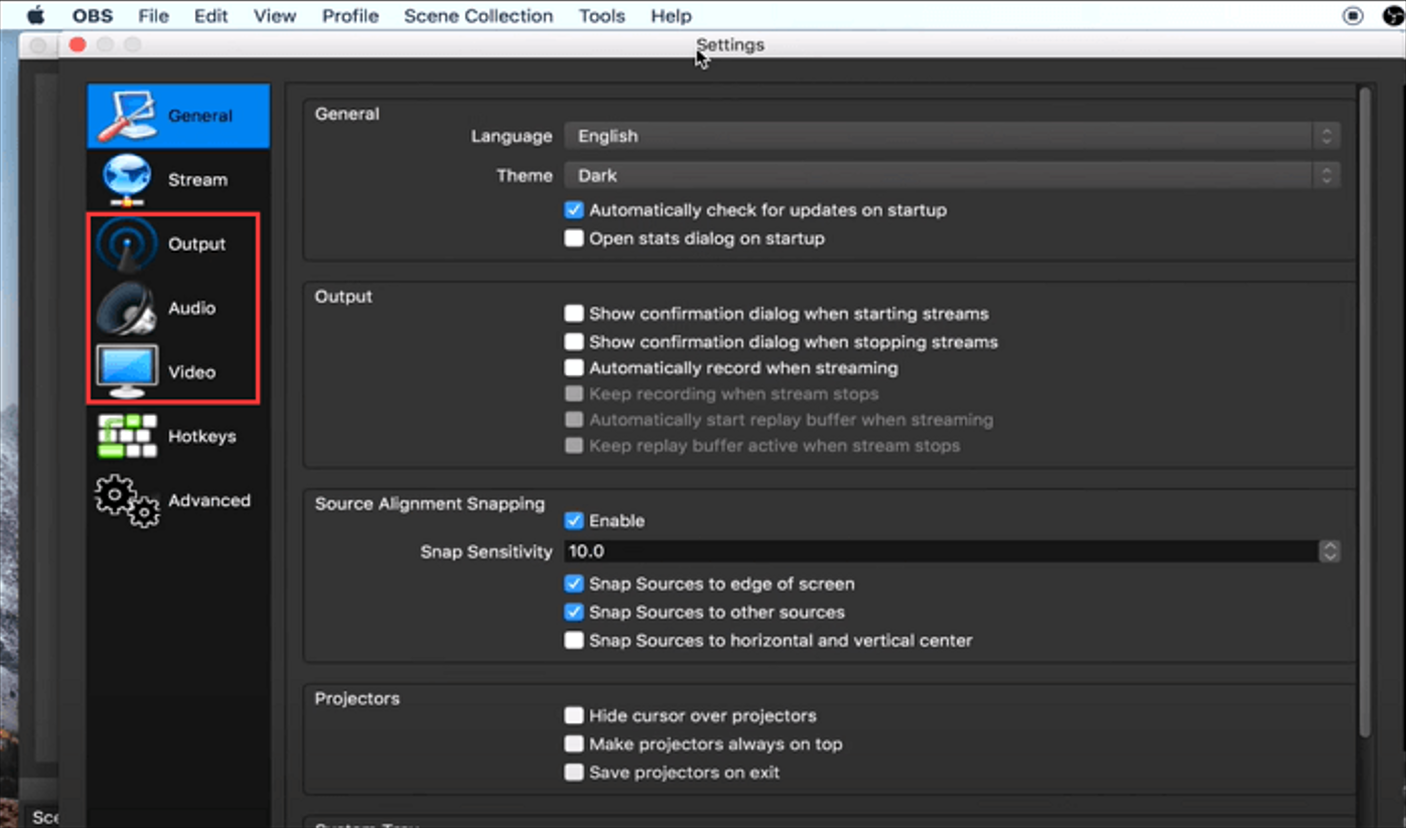
Step 3. Click the "+" button under the "Sources" tab, and check the "Create new" option, then hit OK.
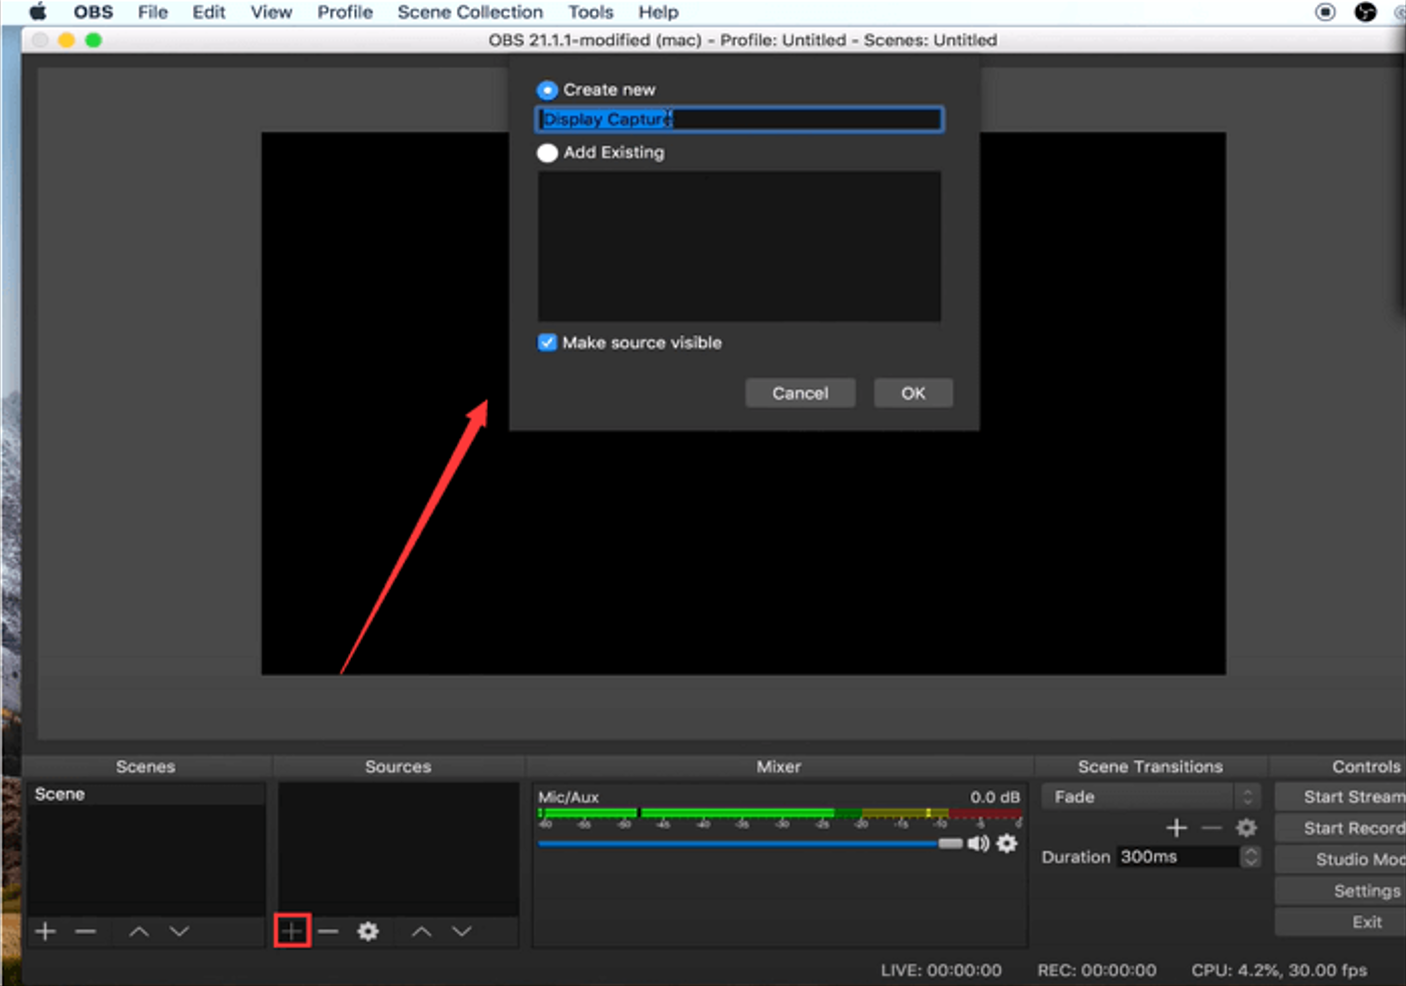
Step 4. Tap the "Start Recording" button in the bottom-right corner to record the screen with sound on MacBook Pro.
Step 5. Click "Stop Recording" to finish the process.
4. Screen Record on MacBook Pro with Sound via Screenshot Toolbar
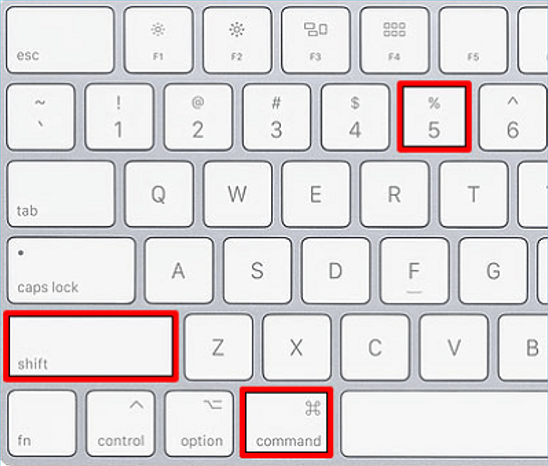
If you don't want to download other applications, macOS also comes with built-in tools you can utilize. If you have Mojave or one of the above versions, you can launch the Screenshot Toolbar by pressing "Shift + Command + 5". It is a practical tool to record screens with sound on MacBook.
Warm Tip: You should be aware that the Screenshot Toolbar only records audio from microphones.
Here are the steps to record screen with microphone sound on MacBook Pro:
Step 1. Press the "shift + command + 5" keys to open the Mac Screenshot Toolbar.

Step 2. Tap the "Options" button to adjust the recording settings, which include the storage location, trimer, microphone, and other settings. Select the microphone here.
Step 3. Decide whether to record the entire screen or only record part of the screen, then click the "Record" button to start the procedure.
Step 4. When you finish, hit the "Stop" icon or "Command + Control + Esc" hotkeys.
5. Screen Record on MacBook Pro with Sound via QuickTime Player
QuickTime Player is another macOS built-in screen recorder that is compatible with each version of the MacBook Pro. You can use it to record screens with microphone sound.
Compared with ScreenToolbar, QuickTime Player offers more video and audio recording options and allows you to customize recording settings.
❗ However, you should note that QuickTime Player doesn't support system audio recording.
Start screen recording with sound on MacBook Pro by following the steps:
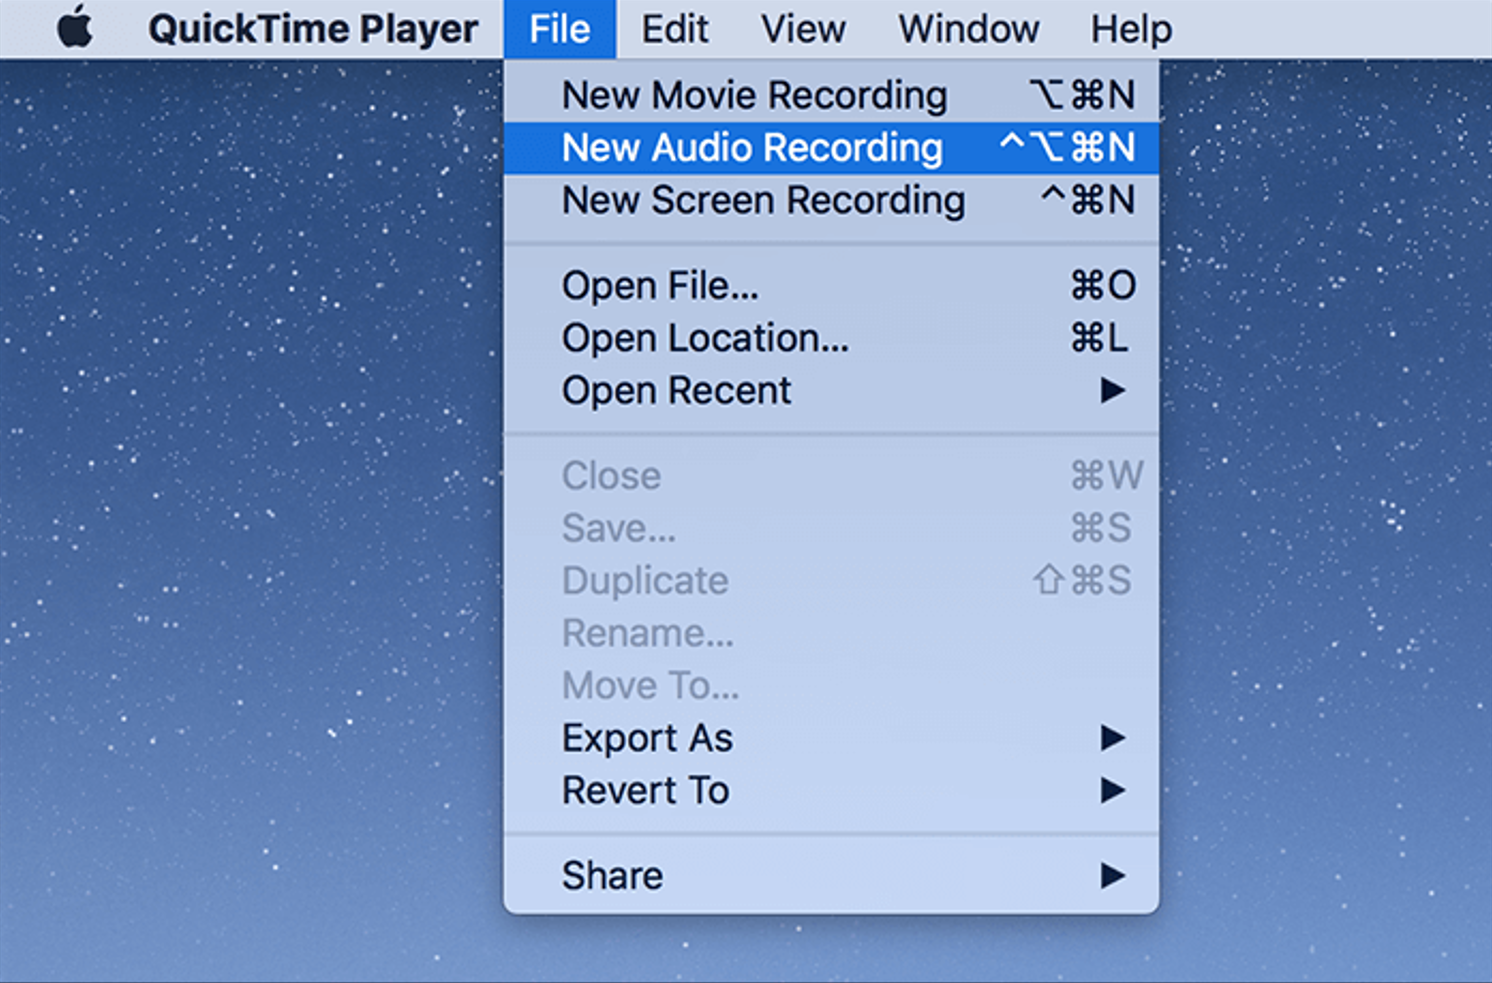
Step 1. Open QuickTime Player on MacBook Pro.
Step 2. Click the "File" option from the top menu bar, and choose "New Screen Recording".
Step 3. Click the arrow beside the red record button, check the "Internal Microphone" to enable the sound option, then click the "Record" button to start the process.
Step 4. When finished, tap the Stop button and save your recording to the local file.
Sum Up
As previously noted, screen recording with sound on a MacBook Pro can be accomplished using various methods. You can capture audio and video simultaneously using a built-in tool like the Screenshot Toolbar or powerful software like EaseUS RecExperts. You may simply create tutorials, record live streams, and capture critical events on your computer screen with these options.
As for us, EaseUS RecExperts is our top choice because of its simple operation and high-quality recording outcomes. It will be a valuable tool to record and save your crucial moments, whether you are a beginner or an expert. You won't be disappointed if you give it a shot.
Share this post
Leave a comment
All comments are moderated. Spammy and bot submitted comments are deleted. Please submit the comments that are helpful to others, and we'll approve your comments. A comment that includes outbound link will only be approved if the content is relevant to the topic, and has some value to our readers.
Comments (0)
No comment