You must have a basic understanding of Javascript programming language if you wish to create microservices for real-world applications using NodeJS. In this article, we'll be building a microservice using a unique combination of external APIs and Node.js.
Building Microservices with Node.js
Prerequisites and initialization
First things first, to get the most out of this tutorial, you need to be familiar with the Javascript and HTTP requests. If you follow this process step by step, we will be able to create a real-world application of microservices using NodeJS and consuming the external API called ZipCodeAPI.com.
Now, before you get started, make sure you have installed the NodeJS development framework. After that, you have to prepare as following in your terminal:
- First, create a directory named Microservices and then open that directory.
- After that, you can utilize the Node package manager to acquire necessary dependency packages like Express and Request. (Express is one of the popular backend development frameworks of NodeJS and Request can help you communicate with external API).
You have to execute the order: 'npm i express request --save’ to install both dependency packages mentioned above.
Here 'i’ is the abbreviation for installation whereas the '--save’ is the attribute that allows the dependencies to be added to the package.json file. If you are using the latest version of the NPM packages then they will be added automatically but it's better to be safe than sorry. Therefore we have used the attribute '--save’.
In your NPM package, you will be provided with one more package namely node_modules which is a directory that can store the external modules that are required in your project.
Setting up the server
Now, you have to make a new entry file named server.js from the tree structure of this project. You will have to execute this file when we have to start our server. Add the code mentioned below in your server.js file:
const express = require('express');
const app = express();

app.use(express.json());

const routes = require('./api_routes/routes');
routes(app);
const port = process.env.PORT || 3000;

app.listen(port, () => {
    console.log(`Listening to port http://localhost:${port}`);
});
After passing the app instance to the routes object, we can create more routes in our primary file that we will need later in this project. After this, we will see how we can define these route files. When you are running the server, the app will be able to listen using port 3000 or any other port that has been specified in the code that is available in the PORT environment.
Specifying the routes
We have to create a file named quotes.js in the api_routed folder and add the code mentioned below:
'use strict';

const controller = require('../controllers/appController');

module.exports = (app) => {
    app.route('/about').get(controller.about);
    app.route('/distance/:zipcode1/:zipcode2').get(controller.getDistance);
}
/about and /distance/:zipcode1/:zipcode2 are two endpoints that are mentioned in the above code. The first one is used to provide details about the application. Meanwhile, the second one is used to calculate the distance in miles between two different zip codes with the help of an external API. The endpoints will be implied in the controller file, which we will discuss in the next step.
Building the controller
NodeJS uses the controller object to decode the user intent and then manage all the received requests using the route modules that we created earlier on in this guide. Now, you have to create a new file and name it controllers/appController.js. After that add the following code to the file:
'use strict';

const properties = require('../package.json');
const distance = require('../service/distance');

const controllers = {
    about: (req, res) => {
        const aboutInfo = {
            name: properties.name,
            version: properties.version,
        }
        res.json(aboutInfo);
    },

    getDistance: (req, res) => {
        distance.find(req, res, (err, dist) => {
            if (err)
                res.send(err);
            res.json(dist);
        });
    },
};

module.exports = controllers;
In this code, the controller object is seen to be carrying two functions, i.e. about() and getDistance().
The about function is used to accept two arguments, i.e. a pair of requests and responses. You can look up the package.json properties for the name and version values.
On the other hand, the getDistance function also possesses two arguments the same as about, a pair of requests and responses. It uses them to fund the defined API in the services folder.
Establishing the call
Now we have reached the stage where we have to make an API call. We will do that using the third-party API that we mentioned before in this article, i.e. ZipCodeAPI.com. You can get a free API key from them by simply registering for an account on their website. If you want, you can use the test API key in this example. But I have to warn you that it expires after a few hours.
To create the microservices, we already have stored API keys and the zipCodeURL in our environment variable. We have named them ZIPCODE_API_KEY and ZIPCODE_API_URL. So, now is the time to build our microservices using the code mentioned below:
const request = require('request');

const apiKey = process.env.ZIPCODE_API_KEY ||
    "hkCt1nW1wF1rppaEmoor7T9G4ta7R5wFSu8l1dokNz8y53gGZHDneWWVosbEYirC";

const zipCodeURL = process.env.ZIPCODE_API_URL;

var distance = {
    find: (req, res, next) => {
        request(zipCodeURL + apiKey +
            '/distance.json/' + req.params.zipcode1 + '/' +
            req.params.zipcode2 + '/mile',
            (error, response, body) => {
                if (!error && response.statusCode == 200) {
                    response = JSON.parse(body);
                    res.send(response);
                } else {
                    console.log(response.statusCode + response.body);
                    res.send({
                        distance: -1
                    });
                }
            });
    }
};

module.exports = distance;
Here we have to load the request package first. It will process the external HTTP request. After that, you can load your API key and zipCodeURL from the environmental variable.
In this code, we used the find function to build a request object and wrote a callback function there so that when the response is received, we will get a call. If the status of the response is HTTP 200 and there is no error in our function then it means that the body of the response is parsed and returned which indicates that it's successful. Now, if any errors have occurred then they will be logged directly into the console and the returned response will show -1.
Execution
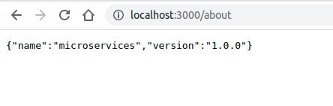
Now, if you have arrived at this stage that means all went well with the development of microservices and now you can execute the code. You can do this by running NPM start in your project terminal. If it runs smoothly then you will be able to hit the about endpoint of the code and can see its output on your web browser.
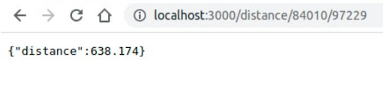
Similarly, if you have passed some values in the query string and you have successfully hit the distance endpoint then you can see its output as well.
So, this was the process for building microservices using NodeJS to find out the distance between two different ZipCodes.
Challenges of Building Microservices in Node.js
One of the biggest challenges you face while building microservices is managing errors. If you want to build a successful microservice, then you must handle all errors gracefully, otherwise, your system will not be able to handle errors properly.
The second challenge is how to handle API calls. The API calls don’t have to be in a single location where they can be handled easily by the code base itself. You have to build an API gateway that will handle these API calls and return responses to the client applications for further processing.
Another challenge with building microservices is maintaining consistency across them. You don’t want your code base structure to change when adding new services to it because it will make it difficult for other developers who are working on different projects within your organization or company, so maintaining consistency across all of them is very important for your team members as well as for customers. For more about API, you may visit our API site for examples of how we provide web services.
The biggest challenge for building microservices in Node.js is the complexity of managing all the components involved. For example, you can't just write a C++ or Java application in your language of choice and expect it to seamlessly run on a server without any changes required.
Final thoughts
NodeJS is a reliable framework for building Javascript microservices and real-world applications. NodeJS can not only provide a suitable environment for these development purposes but can also assist in many operations that will be beneficial to the developers. We can say for sure that soon, NodeJS will be used widely to build reliable open-source tools and microservices for enterprise-level software.
Share this post
Leave a comment
All comments are moderated. Spammy and bot submitted comments are deleted. Please submit the comments that are helpful to others, and we'll approve your comments. A comment that includes outbound link will only be approved if the content is relevant to the topic, and has some value to our readers.
Comments (0)
No comment